While the content of Harvest, such as names of a church, can be in a maximum of two languages, the actual screens can be translated in an unlimited amount of languages. For example, you could have the data in both English and Thai, and the interface in English, Thai, Korean and Dutch to help various missionaries from across the world to understand your churches in their language.
Now how do you need to handle translations in the Harvest system? It depends a bit on what you need to do. Below you find several ways in which you will need to provide translations:
Step 1: You will receive an e-mail from GlobalRize that we have 'released' a new version onto the server. This probably means there are new reports, screens or fields available that need to be translated.
Step 2: Log in to Harvest.
Step 3: Navigate to System Setup - Labels And Prompts.
Step 4: Search for the language you want to provide translations for by selecting the language in the search dropdown field, and press Search.

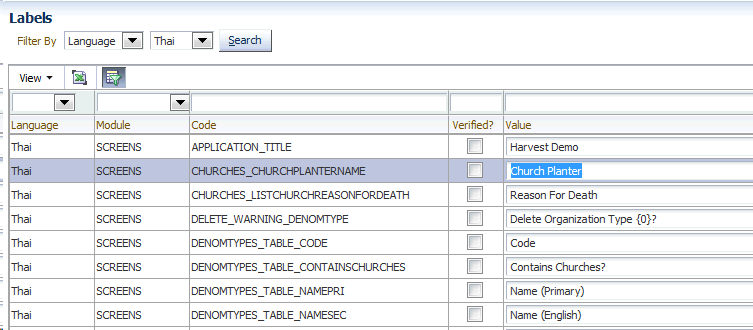
Step 5: You will now get a list of all elements in that language that have NOT been translated yet and will therefore be in the standard language of Harvest: English.Click on a field in the Value column to translate that value into Thai. So in the example below, you should translate "Church Planter" into your local language.
NOTE: if you have not (yet) done all the translations for the previous releases of Harvest, there may be many fields here to translate. However, once you have translated everything you will only be presented with the few fields that have been added since the latest version.

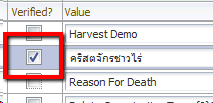
Step 6: After you have translated the field, click in the next Value field, or press the Tab button twice to jump to the next field. The 'verified' box will become 'checked'. This means that it is a valid translation and you won't be asked for a translation again.

Step 7: After you have translated everything, do not forget to press Save. The translations take an immediate effect, so you can go to the particular screen to see the results.
Sometimes you may see a piece of text in the system that is not translated correctly, or you would like to use a different term (even in English). How do you do that?
Step 1. Write down the text that you need to have changed as it is in the system. (you can also copy the text).In the example screenshots below you would write down "Educational Level".
Step 2. Go to System Setup - Labels and Prompts
Step 3. Click on 'Switch to Advanced Search'
Step 4. Select the language of the text that needs to be fixed in the search field. Under 'verified?', select the empty value (not yes or no). This ensures we find all text fields, whether already translated or not.
Step 5: Enter the text that need to be changed (as written down in step 1) in the 'Value' field. Your search should now look similar to this:

Step 6: Hit the Search button. You will be presented with all text fields in that language that match the value. This may be one, but also be more, as in our example:

Step 7: Change the Value into what you want it to be. As you can see in the example above, you may need to do this multiple times if you need the label to change in the various places.
Step 8: Click Save to make your changes available immediately.
You may want to check all your current translations, or may still need to finish them. How to do that?
Step 1: Log in to Harvest.
Step 2: Navigate to System Setup - Labels and Prompts
Step 3: Click on 'Switch to Advanced Search'
Step 4: Select the empty value for 'Verified?' (neither Yes nor No). Note: do NOT select a language at this point! Then click Search:

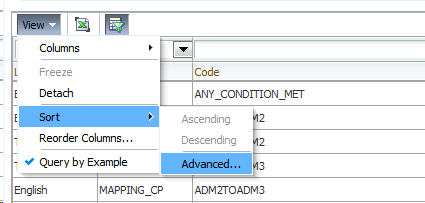
Step 5: You will be presented with all labels in your system, in every language. You will need to sort them to do the translations. Above the table, click on View > Sort > Advanced.

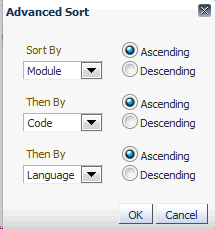
Step 6: Sort by Module, then Code, then Language, like below, and click OK.

Step 7: You can now scroll through all your translations. You will see all the translations for one field grouped together, so for example the English and Thai version of 'Church Name' will be right after each other.
Hint: the 'Verified?' column (with the checkboxes) should indicate which fields still need to be translated. Look for fields that do not have it checked, and see if they are translated correctly from English. Check the 'Verified?' column to indicate they are correct, or change the current text there.
Step 8: Save your changes by hitting the save button.