The Contact Persons tab displays the contact persons for this organization. These may be leaders, church planters, secretaries, ministry officials, etcetera.
The table on the left (with the Role / Name columns) shows the various persons involved in this organization. On the right, details are displayed about that person. To see more information about that person, or update their details, click on the Persons name in the table.
NOTE: The Contact Persons tab on the Organization screen is different than the Contact Persons for the system. The difference is that this tab only shows persons for this particular organization, while the other tab (at the top of the screen) allows you to search all contact persons in the whole country, and add new contact persons as well.

To enter a new contact person for a church may require several steps:
Pre-requirements:
Step 1: Press the green 'plus' button which will create a new contact person entry field:

Step 2: Select the role for the contact person (e.g. secretary).
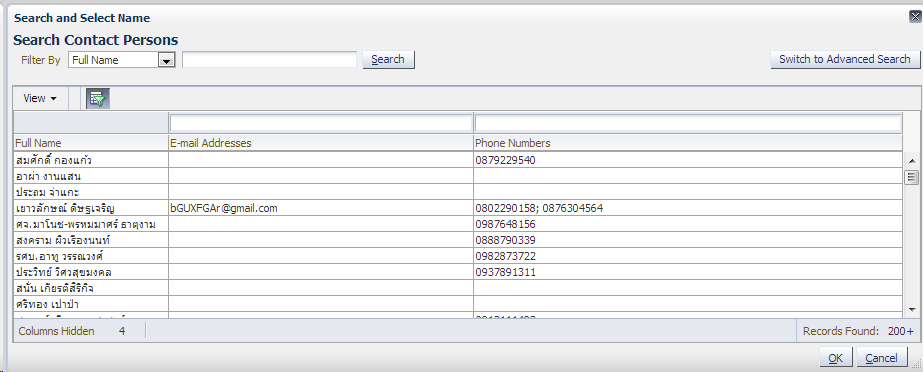
Step 3: Then press the magnifying glass icon that will open up the Search Contact Person pop-up form

This form allows the user to search for an existing name. This form contains all contact persons in the database from all organizations. Note: Harvest stores the information about a contact person (such as a pastor) centrally, so that pastors can easily be assigned to multiple churches without having to re-enter their data every time.
If the person is already in the database the user selects the name of this person and presses the OK button to assign the contact person to this church. Click Save and you are finished.
If the person is not in the database additional steps 3-5 are required:
Step 3
The user needs to open another browser tab or window and enter their harvest URL (https://harvest.globalrize.org/NAME of your COUNTRY). Since the user is already logged they do not have to login a second time. Hint: store your Harvest URL as a bookmark, so you can easily click on that bookmark instead of having to type it every time.
Step 4
The name of the new contact must be entered. (see instructions on how to enter a new Contact Person)
Step 5
Once the new name has been entered into the system the user must return to the first tab and repeat step 2 to add the newly added contact person to this organization.